iTop Bulk Event
Combodo's customers only
- name:
- iTop Bulk Event
- description:
- Bulk change logs or attributes and bulk apply events on a group of tickets
- version:
- 1.1.1
- release:
- 2023-07-13
- code:
- itop-bulk-event
- state:
- stable
- diffusion:
- Client Store
- php-version-max:
- PHP 8.1
This extension provides support agents with the capability to update attributes, to update case logs and to apply life cycle actions to a set of tickets.
It differs from the standard 'bulk modify' capabilities of iTop as it allows such bulk actions to be applied to a selected set of tickets regardless the organization of the caller or the value of other attributes. The extension will check the coherency of the different tickets in the set and will offer to apply the chosen bulk event to a coherent subgroup of the initial set.
Features
It may be usefull for support agents who are reaching the end of their working shift to assign the set of tickets that is assigned to them to a colleague of them: the lucky one who will take over their work. Such feature is precisely one of the features that the extension is bringing to iTop.
Bulk Event Management is enabling 3 types of bulk changes, each of them being handled through different processes:
-
Change Attributes: a set of attributes is changed on the listed tickets. The list of attributes to be changed is chosen amongst a predefined (by an iTop administrator) set of attributes.
-
Change Case Logs: predefined case logs are updated on the listed tickets. Note that standard email reply and precanned replies options can be used here.
-
Change Status: a life cycle action is executed on a set of tickets.
These actions are, of course, available when more than 1 ticket are listed (as a result of a search, for instance).
Revision History
| Date | Version | Description |
|---|---|---|
| 2023-07-13 | 1.1.1 | * Deprecate old unreferenced methods that are @deprecated |
| 2022-02-09 | 1.1.0 | * Add 3.0 compatibility * Fix blank mandatory fields not prompted in transition |
| 2021-10-05 | 1.0.0 | * Fix “Error: the object has already been
updated.” on Windows with transaction_storage=File * Fix missing dict key for page title * Fix unselecting objects has no effect |
| 2020-08-17 | 0.1.13 | Enhancement to handle special dependencies between fields |
| 2020-03-12 | 0.1.12 | Fix synchro warning and Correct encoding / decoding or filters according to 2.6 standards |
| 2018-08-22 | 0.1.10 | Corrects bug related to management of flags on transitions |
| 2018-08-08 | 0.1.9 | Replace PHP function “method_exists” by “is_callable” |
| 2018-07-13 | 0.1.8 | Merge 0.1.6 et 0.1.7 to handle a unique branch. Implements the new WizardHelper for state changes |
| 2018-07-04 | 0.1.7 | Implements CountExceeds function on DBObjectSet |
| 2018-07-03 | 0.1.6 | Takes into account attributes MUST_PROMPT / MUST_CHANGE on transitions |
| 2016-07-27 | 0.1.0 | First version |
Limitations
N/A
Requirements
Version 0.1.10 of the extension requires iTop 2.4.1 at least. It requires as well the extensions itop-request-mgmt 2.4.0 (simple or ITIL mode), email-reply 1.1.7 and precanned-replies 1.0.4.
Installation
Use the Standard installation process for this extension.
Configuration
Default configuration of the extension is done through XML. This configuration can be altered through XML and / or completed through the standard configuration file.
By default, the extension enable bulk events on User Requests: any life cycle action can be performed, both public and private logs can be updated and the attributes org_id, title, description, service_id, servicesubcategory_id, impact and urgency can be changed.
  <module_parameters>
    <parameters id="itop-bulk-event" _delta="define">
      <allowed_classes type="hash">
        <UserRequest type="hash">
          <change_case_logs>public_log,private_log</change_case_logs>
          <change_attributes>org_id,title,description,service_id,servicesubcategory_id,impact,urgency,team_id</change_attributes>
        </UserRequest>
      </allowed_classes>
    </parameters>
  </module_parameters>
Should an iTop administrator wishes to change these parameters, he'd just need to add specific lines into the configuration file, for instance:
  'itop-bulk-event' => array (
                'allowed_classes' => array (
                        'UserRequest' => array (
                                'change_case_logs' => 'public_log',
                                'change_attributes' => 'org_id,title,service_id,servicesubcategory_id',
                        ),
                ),
        ),
Managing fields' dependencies
The extension automatically takes into account the dependencies
between the fields as defined in the Datamodel. However there are
some cases where this is not enough (when extra some business logic
was implemented as PHP code), this is why the version 0.1.13
introduces a new configuration parameter
additional_dependencies.
This optional parameter can be used to express that a field from the traget class depends on other fields (using this configuration you can configure that a field defined in a base class actually depends from a field defined in the child class, which is not possible in the actual version of the datamodel).
The configuration should look like the following:
  <module_parameters>
    <parameters id="itop-bulk-event" _delta="define">
      <allowed_classes type="hash">
        <UserRequest type="hash">
          <change_case_logs>public_log,private_log</change_case_logs>
          <change_attributes>org_id,title,description,service_id,servicesubcategory_id,impact,urgency,team_id</change_attributes>
          <additional_dependencies type="hash">
            <team_id type="array">
              <item>application_id</item>
              <item>finalclass</item>
            </team_id>
          </additional_dependencies>
        </UserRequest>
      </allowed_classes>
    </parameters>
  </module_parameters>
Or in PHP (in the configuration file):
  'itop-bulk-event' => array (
                'allowed_classes' => array (
                        'UserRequest' => array (
                                'change_case_logs' => 'public_log,',
                                'change_attributes' => 'org_id,title,service_id,servicesubcategory_id',
                                'additional_dependencies' => array('team_id' => array('application_id','finalclass')),
                        ),
                ),
        ),
The example above defines that the field team_id of
a UserRequest actually depends on both
finalclass and application_id.
Usage
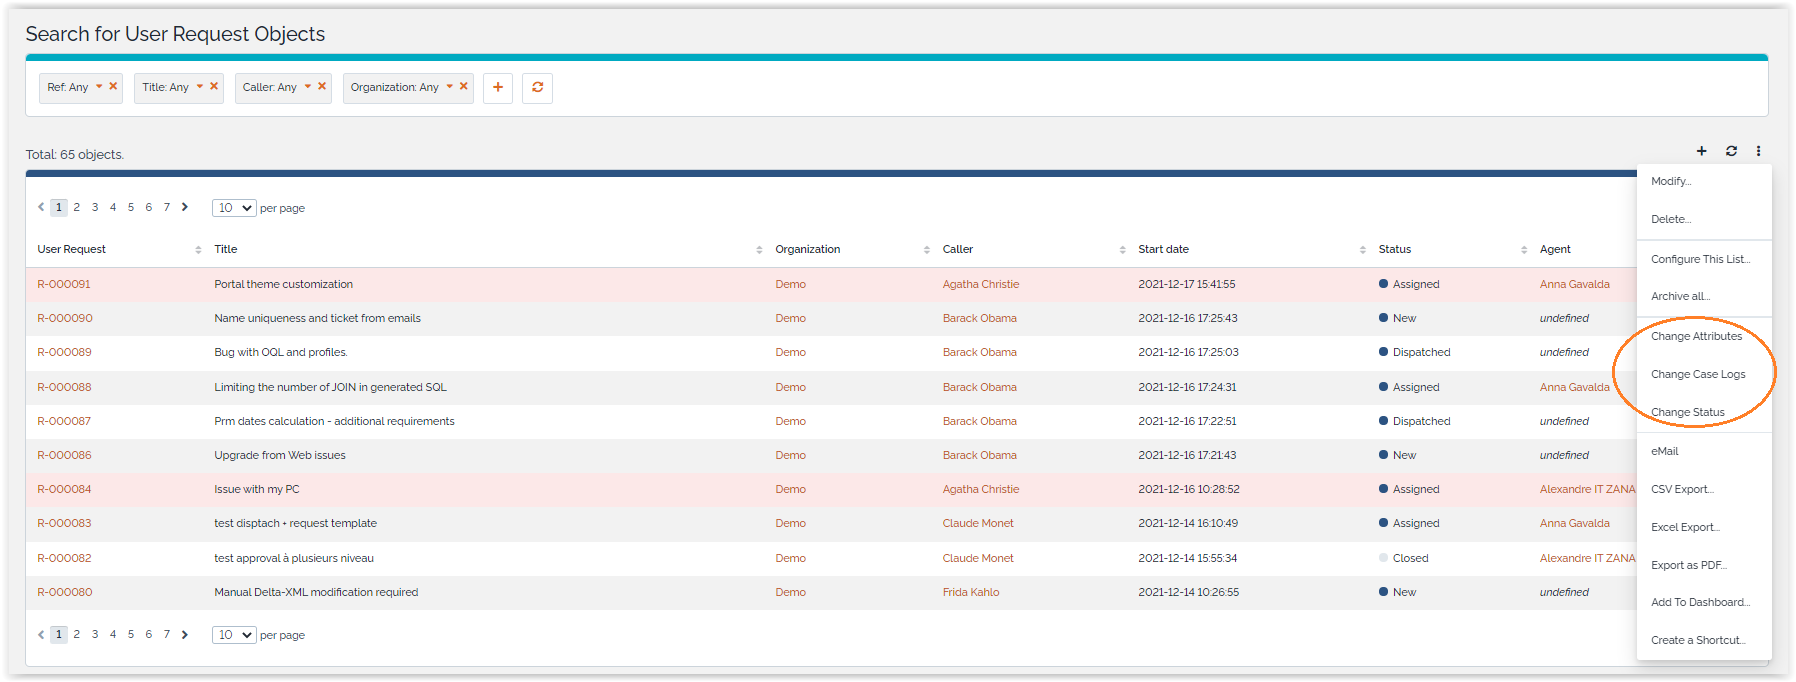
First step is to select a set of tickets. Once done, the standard “Other Actions” menu will show the 3 different possible bulk actions brought by the extension.
Change Attributes
Step 1
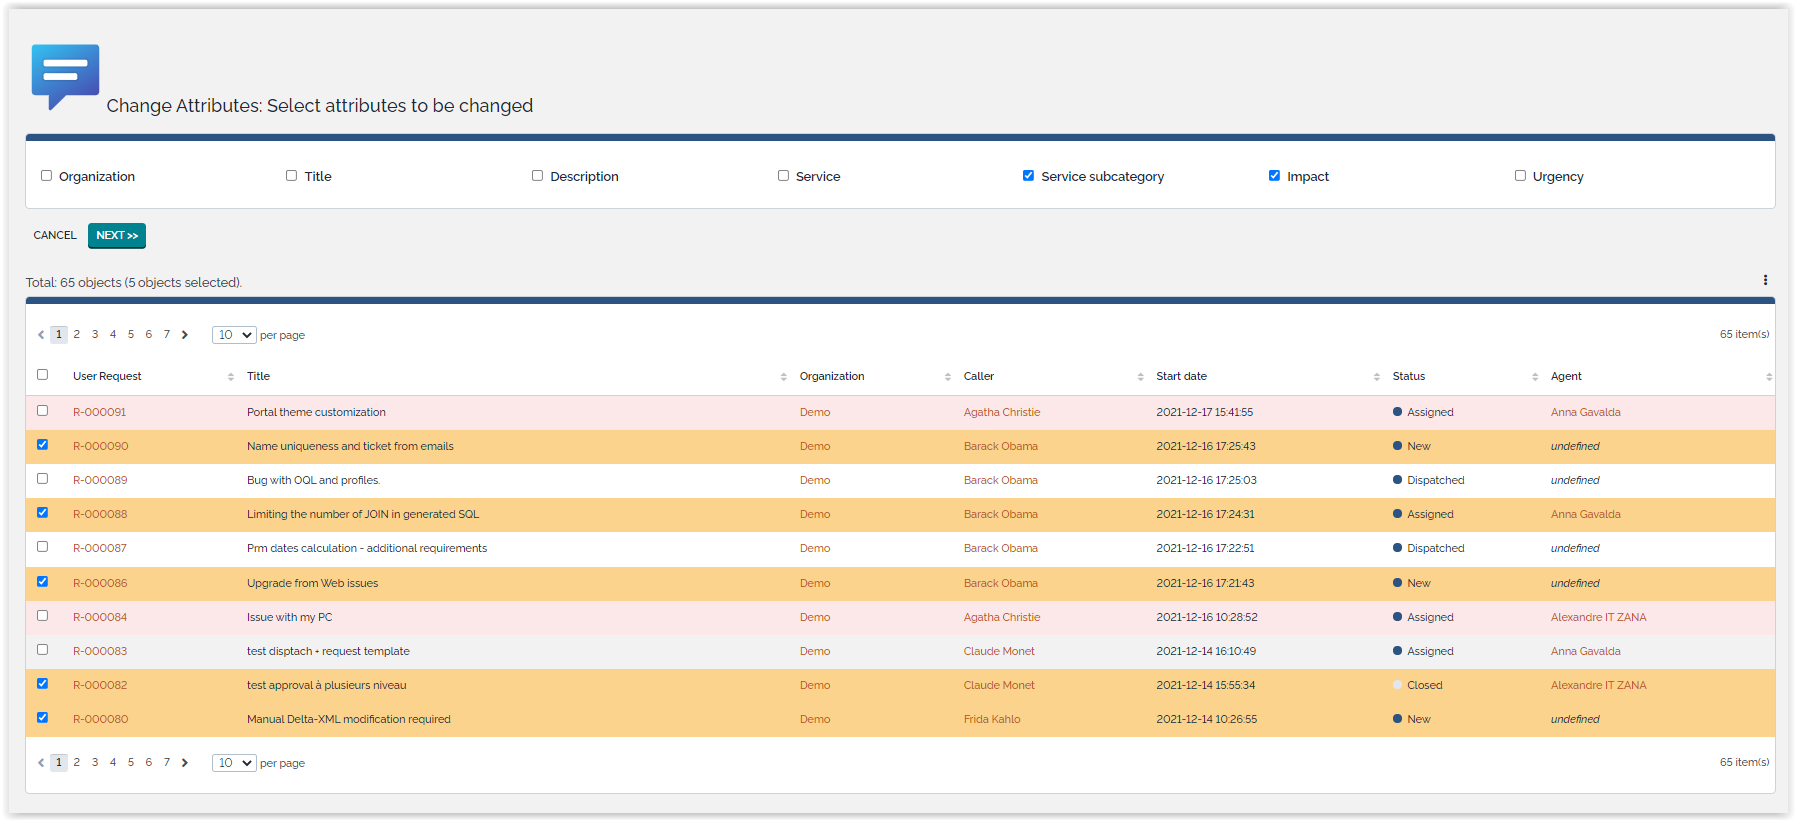
When the “Change Attributes” action is selected, iTop displays the list of attributes that can be changed, followed by the selected tickets.
Step 2
Support agent selects the attributes he'd like to change, reduces, if required, the list of tickets to update by filling the appropriate checkboxes located at the front of each ticket and apply on the “Next” button.
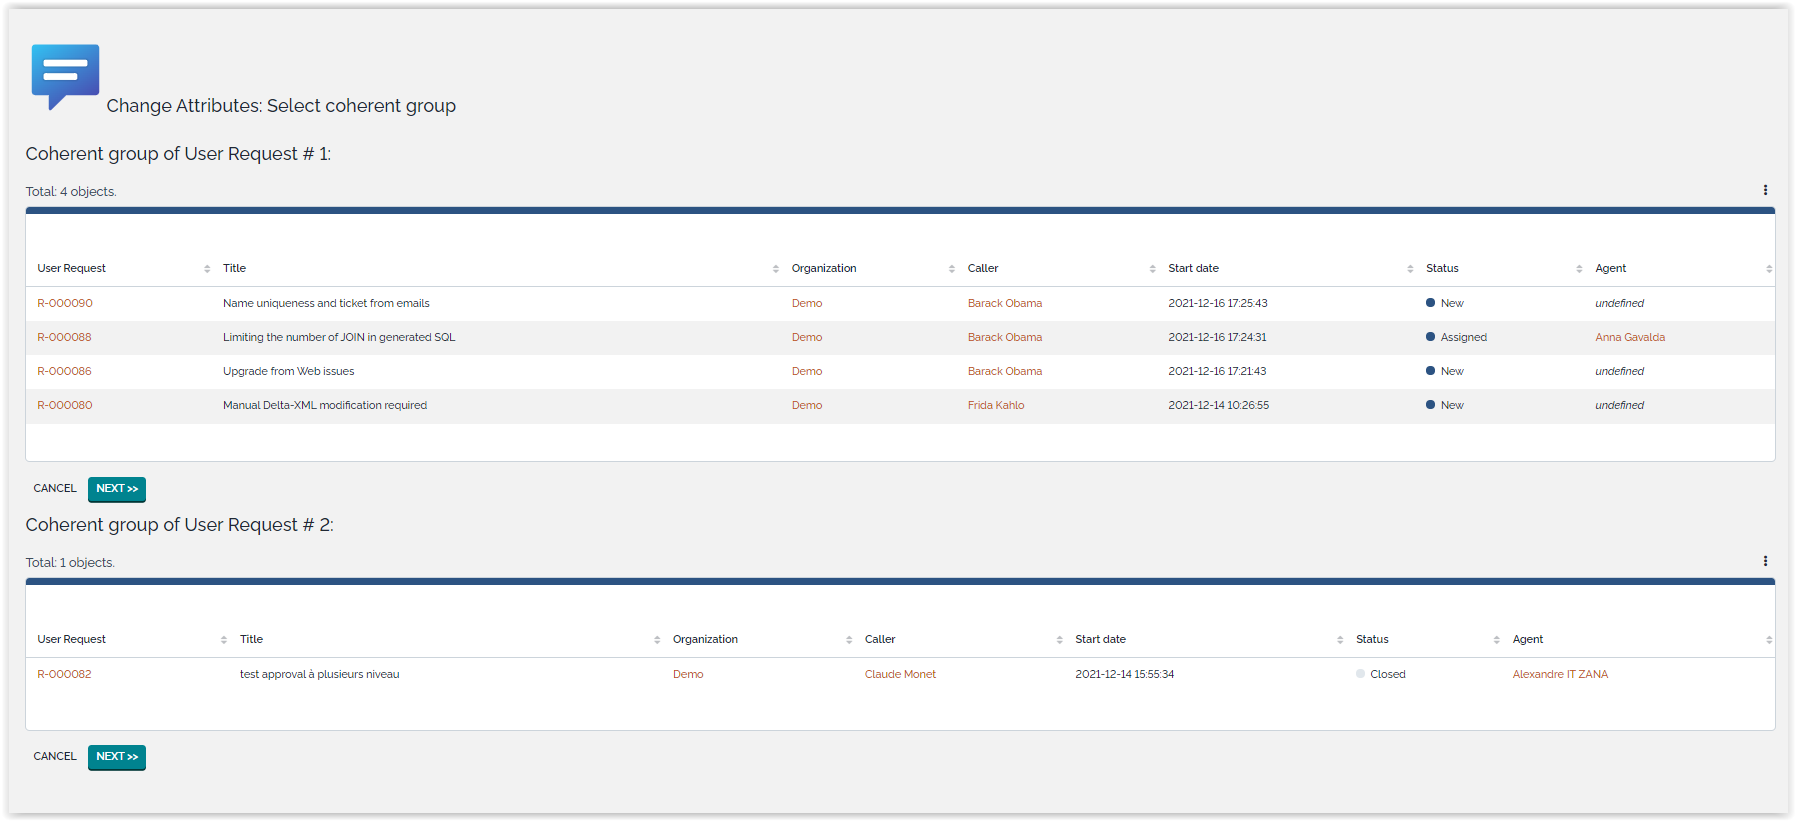
iTop will then prompt the attribute(s) that need to be changed. However, the same choices may not be available for all tickets. This could happen, for instance, if we try to change the service subcategory of tickets that don't have the same service already selected. In such case, tickets will be split into different coherent groups, ie set of tickets for which the same choices can be made for the prompted attributes.
Step 3
Once support agent has selected the correct coherent group, iTop prompts the attribute(s) to be changed. Of course, should all tickets selected at step 2 be coherent, iTop will directly jump to that step.

Step 4
Finally, if all attributes are correctly filled, the modification is applied to the set of tickets.

Pressing the “Done” button will display the list of updated ticket as a standard iTop list.
Change Case Logs
Step 1
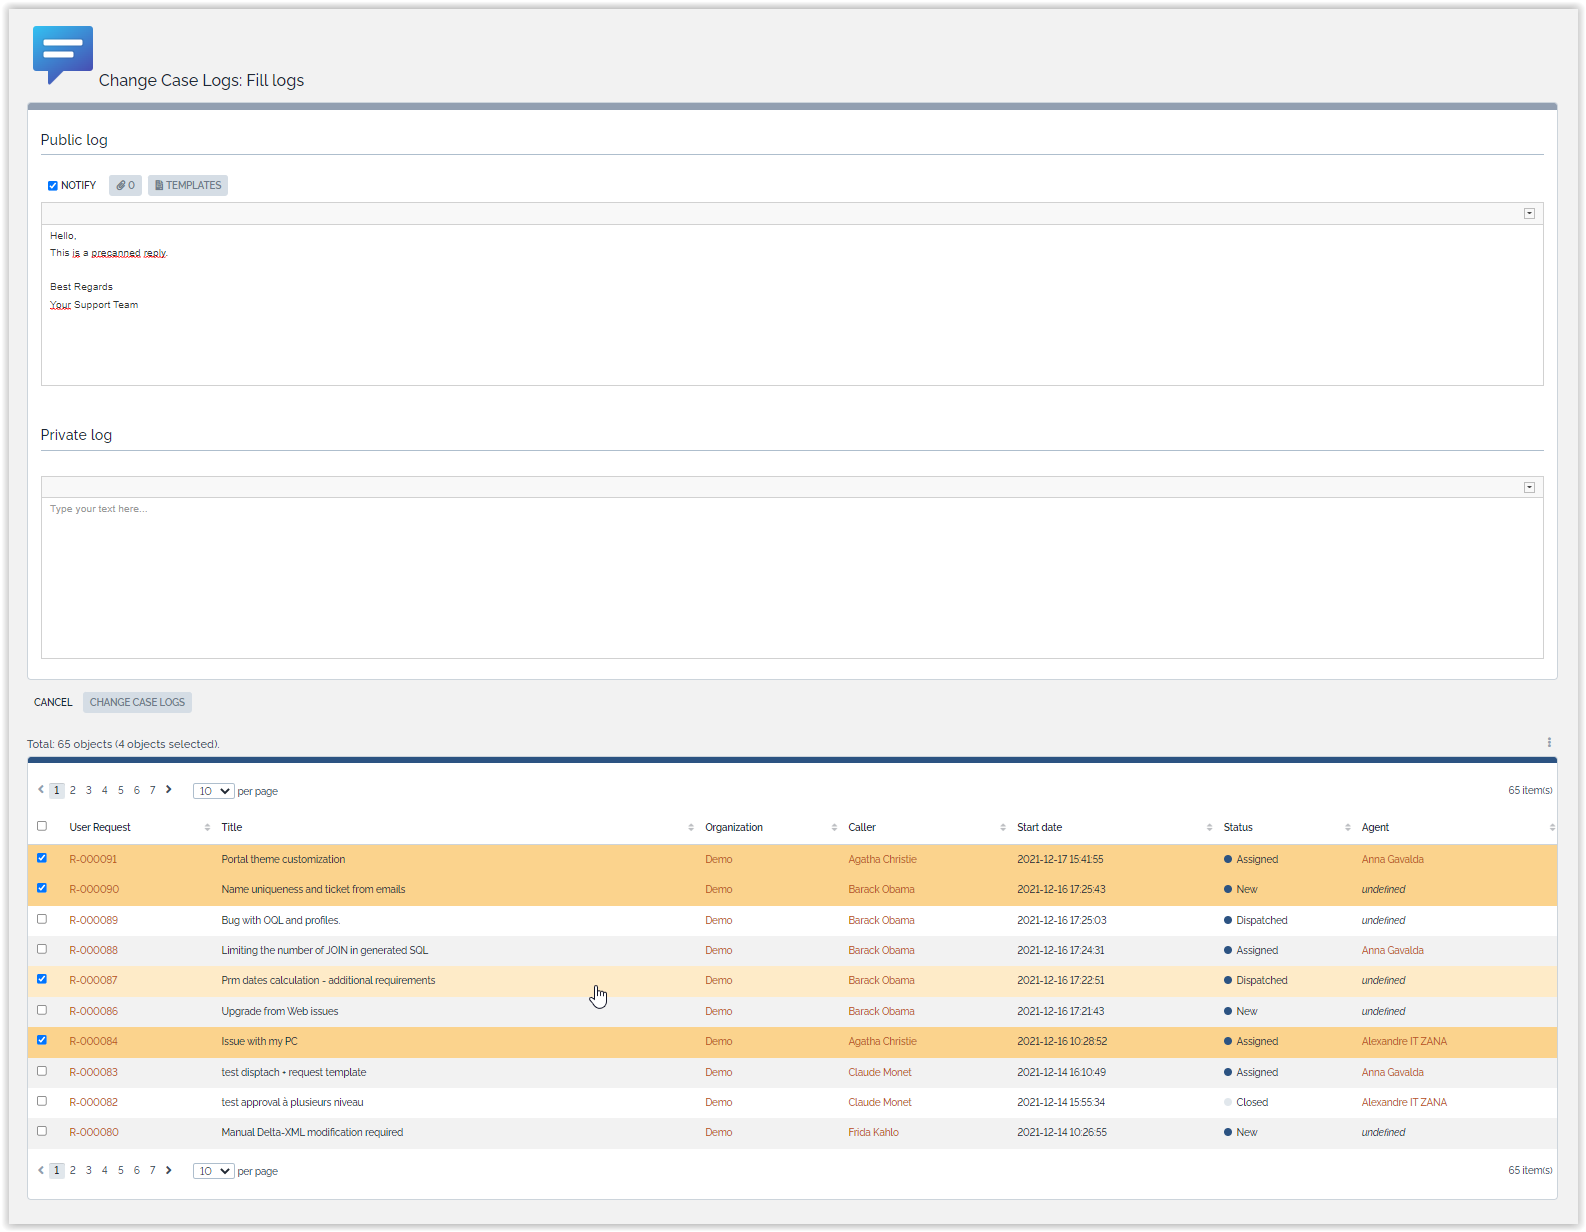
When the “Change Case Logs” action is selected, iTop displays the logs that can be updated (as defined by the configuration parameters) together with the “Email reply” option and the “Precanned replies” selection button.
Step 2
At this stage, the list of tickets to update can be reduced through the checkboxes in front of each ticket. When the “Change Case Logs” button is pressed, the logs of the selected tickets are updated and mail replies are sent.
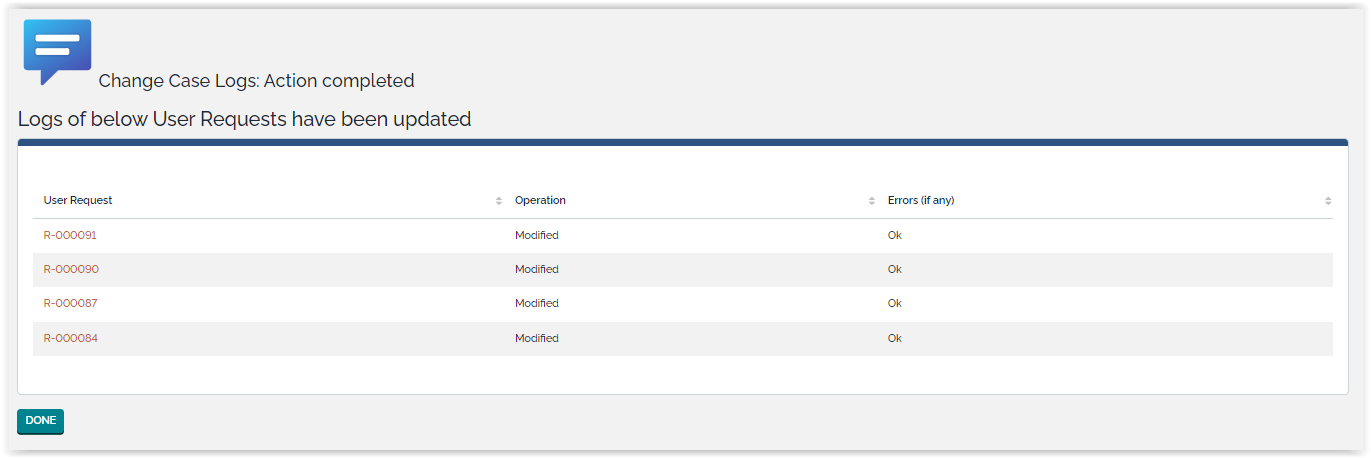
Pressing the “Done” button will display the list of updated ticket as a standard iTop list.
Change Status
Step 1
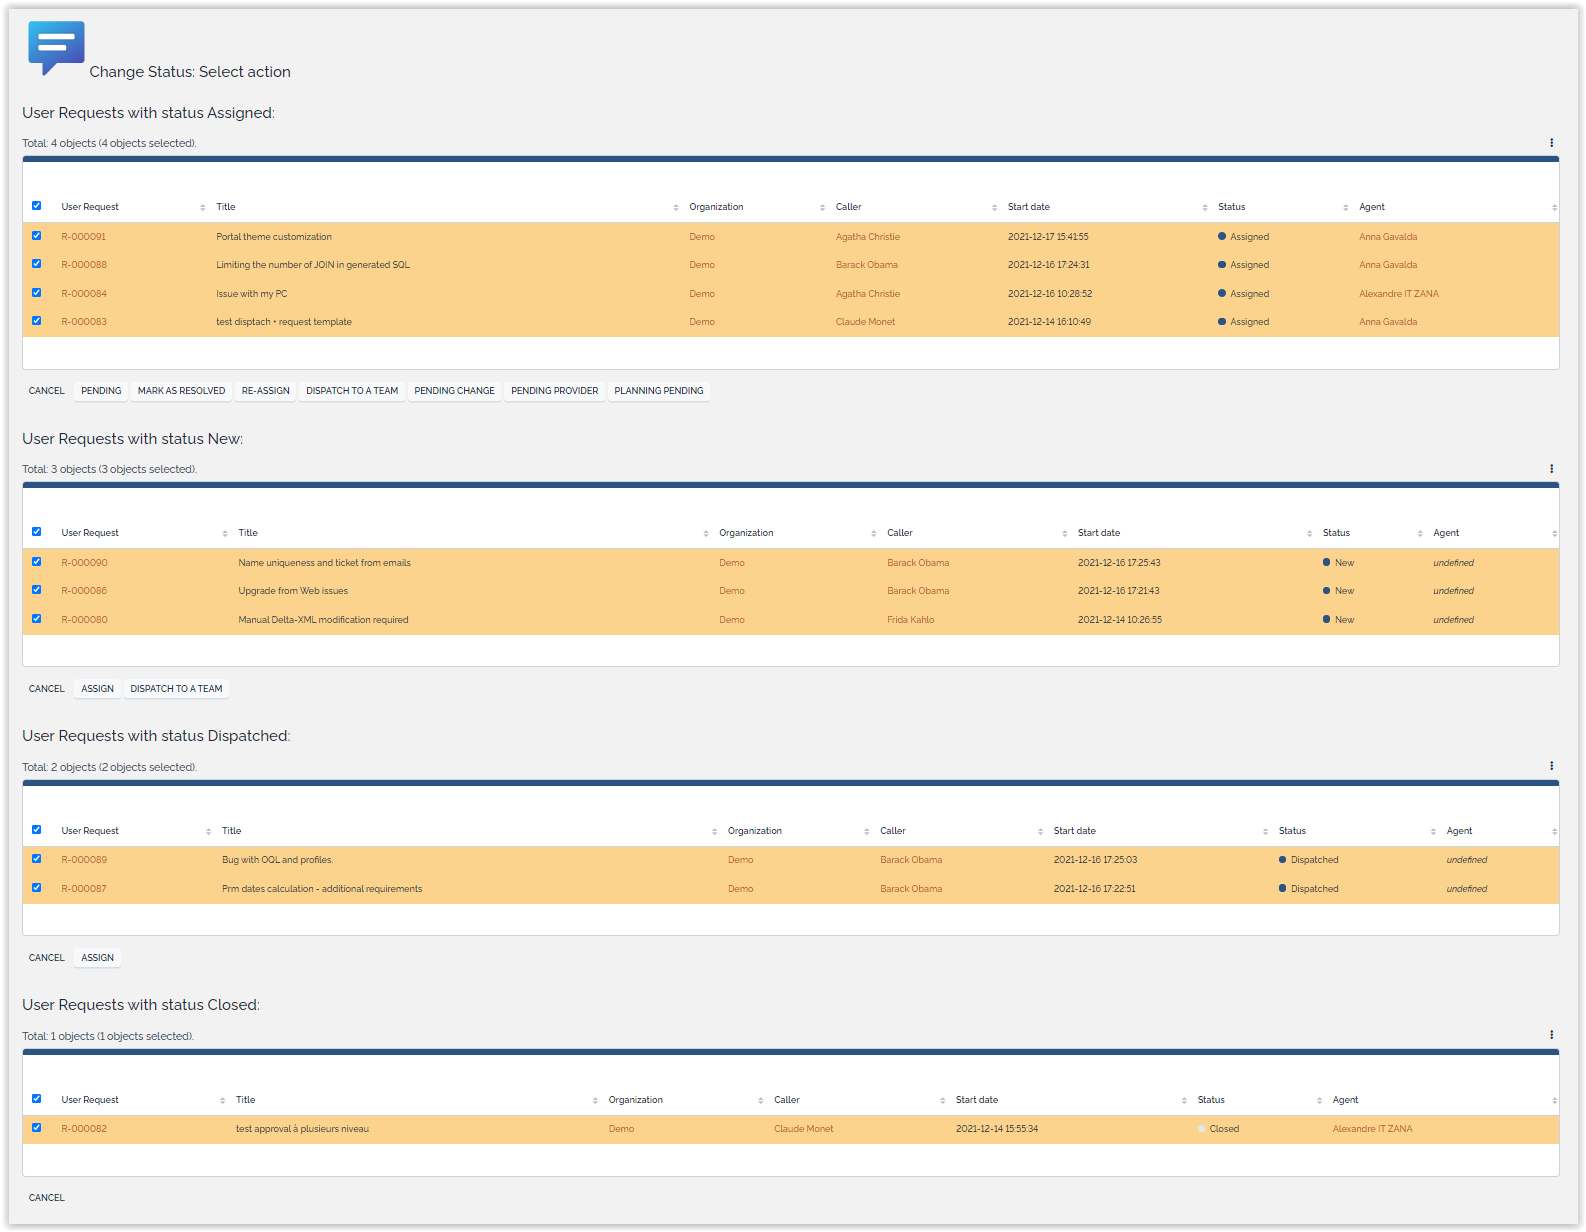
When the “Change Status” action is selected, iTop groups the selected tickets according to their status and, for each group, displays the different actions that can be applied.
Step 2
Support agent selects the group of tickets for which he wants to apply a life cycle action, reduces, if required, the list of tickets to update by filling the appropriate checkboxes and apply the action he wishes to perform.
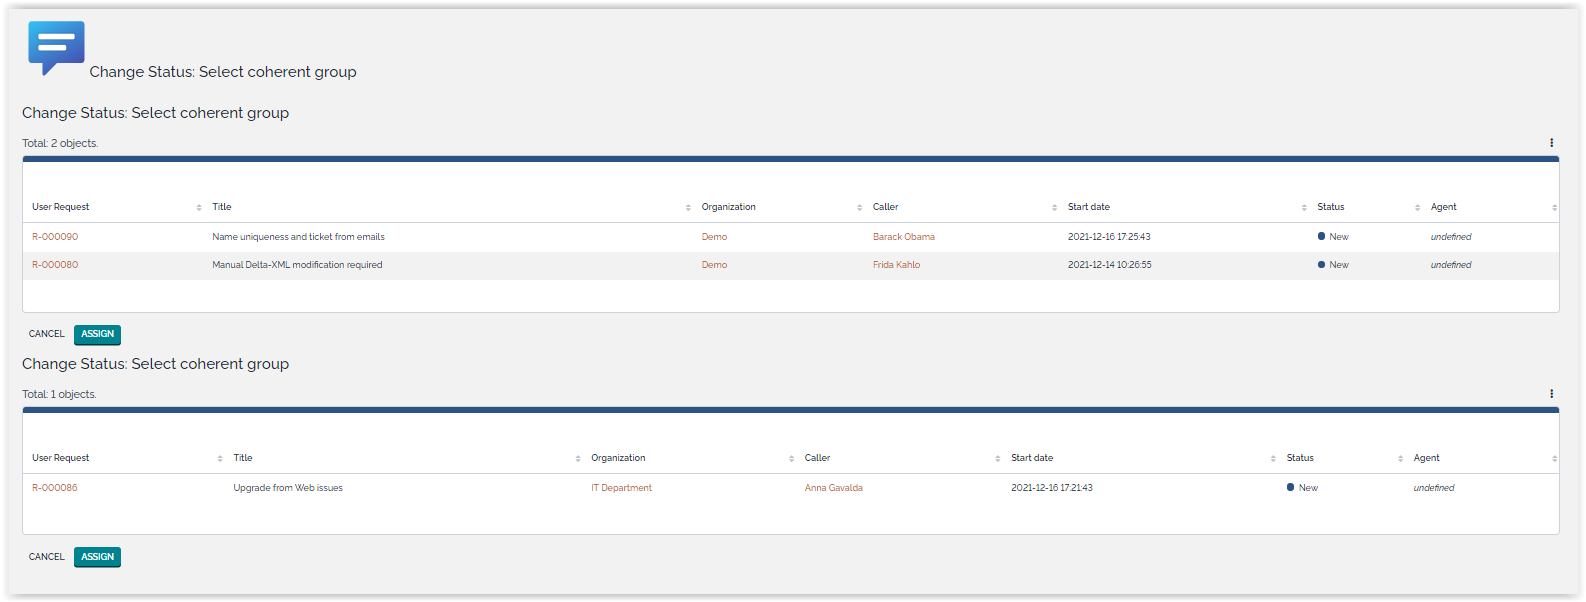
iTop will then prompt the attribute(s) that need to be updated for the given transition, like it would do for a single ticket in the same status for the same event. However, the same choices may not be available for all tickets. This could happen, for instance, if we try to assign tickets that belong to different organizations for which different support teams are used. In such case, tickets will be split into different coherent groups, ie set of tickets for which the same choices can be made for the prompted attributes.
Step 3
Once support agent has selected the correct coherent group, iTop prompts the attribute(s) to be changed. Of course, should all tickets selected at step 2 be coherent, iTop will directly jump to that step.

Step 4
Finally, if all attributes are correctly filled, the event selected by the support agent is applied to the set of tickets.

Pressing the “Done” button will display the list of updated ticket as a standard iTop list.
