Automated installation
The installation of iTop is generally performed interactively using the “setup” page. However once information about the desired configuration has been collected by the setup page, the actual installation process is fully unattended and therefore can be automated.
In order to automate the iTop installation you'll need:
-
An XML response file containing the desired configuration options
-
The unattended_install.php script (see below)
Response file
The response file is an XML file containing all the answers / choices to configure the application.
An example of the response file is the following:
- default-params.xml
-
<?xml version="1.0" encoding="UTF-8"?>
<installation>
        <mode>install</mode>
        <preinstall>
                <copies type="array">
                        <copy>
                                <source>C:\inetpub\wwwroot\setup20\datamodel</source>
                                <destination>test_copy</destination>
                        </copy>
                </copies>
                <backup>
                        <configuration_file>../conf/production/config-itop.php</configuration_file>
                        <destination>../backups/__DB__-%Y-%m-%d.zip</destination>
                </backup>
        </preinstall>
        <source_dir>datamodel</source_dir>
        <source_env>production</source_env>
        <target_env>production</target_env>
        <workspace_dir/>
        <database>
                <server>localhost</server>
                <user>root</user>
                <pwd>root</pwd>
                <name>setup20</name>
                <prefix></prefix>
        </database>
        <url>http://localhost/setup20/</url>
        <admin_account>
                <user>admin</user>
                <pwd>admin</pwd>
                <language>FR FR</language>
        </admin_account>
        <language>IT IT</language>
        <selected_modules type="array">
                <module>authent-local</module>
                <module>itop-attachments</module>
                <module>itop-welcome-itil</module>
                <module>itop-profiles-itil</module>
                <module>itop-config-mgmt</module>
                <module>itop-service-mgmt</module>
                <module>itop-tickets</module>
        </selected_modules>
        <sample_data>1</sample_data>
        <options>
                <symlinks>1</symlinks>
                <mysql_bin_dir></mysql_bin_dir>
        </options>
</installation>
Generating the reponse file
The response file can be created manually using a text editor or
generated by running the interactive setup with the additional
parameter option[generate_config]=1.
This is achieved by adding
?option[generate_config]=1 at the end of the
URL to specify this
extra parameter. This gives the following sample URL:
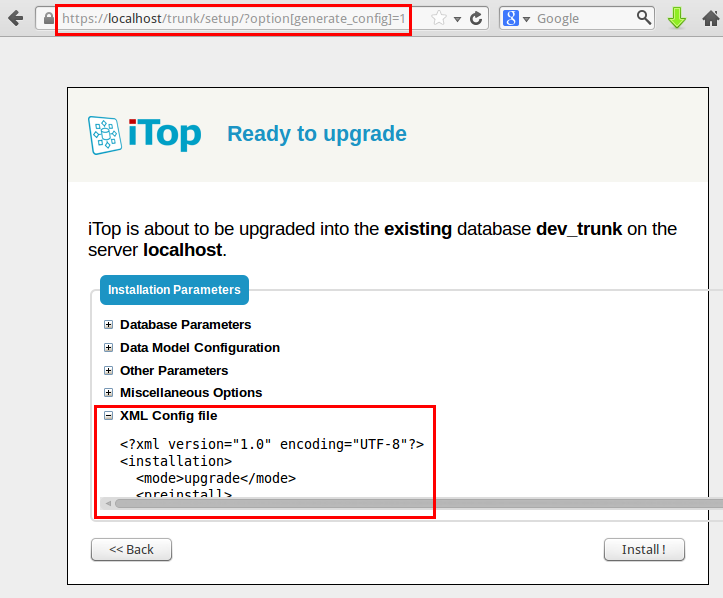
http://localhost/itop/setup/?option[generate_config]=1
Then run the setup as usual, but instead of launching the installation, stop at the “summary” step, and click on “XML config file” to open this section of the summary. You can then copy/paste the response file:
Another way to get a response file is to retrieve the
installation.xml file from an existing iTop
installation. Each time the iTop installation completes, it creates
a file install-<date>-<revision>.xml in
the log directory of an existing iTop installation.
You can use this file for automatically installing another instance
of iTop with the exact same parameters.
Unattended installation script
To automate the installation, use the unattended-install.php file in the itop-toolkit-community repository.
Execution of the unattended installation
Copy the unattended_install.php script in a
toolkit directory at the root of iTop files. Then
launch the script with the following command:
php unattended_install.php --response_file=default-params.xml
Where:
-
default-params.xmlis the reponse file containing your desired settings for the installation
If you are performing an installation, you can add the clean option, by using this option, you ask the unattended install to erase both the directory and database prior executing the installation :
php unattended_install.php --response_file=default-params.xml --clean=1

