Bulk Modifications
There are two ways to perform bulk modifications in iTop:
-
The Interactive CSV Import: this is useful for re-importing a set of exported and modified data. FIXME missing date format capabilities
-
The Modify action on a list of objects: this is useful for data clean-up (normalization) when you want to align values within a set of objects, or for daily operations when you need to modify many objects in the same manner.
Interactive CSV Import
iTop provides a powerful CSV Import feature to assist end-users (and administrators) in massively creating or updating objects in iTop.
To launch the CSV Import Wizard, click on the CSV Import menu in the Data Administration section.
CSV Templates
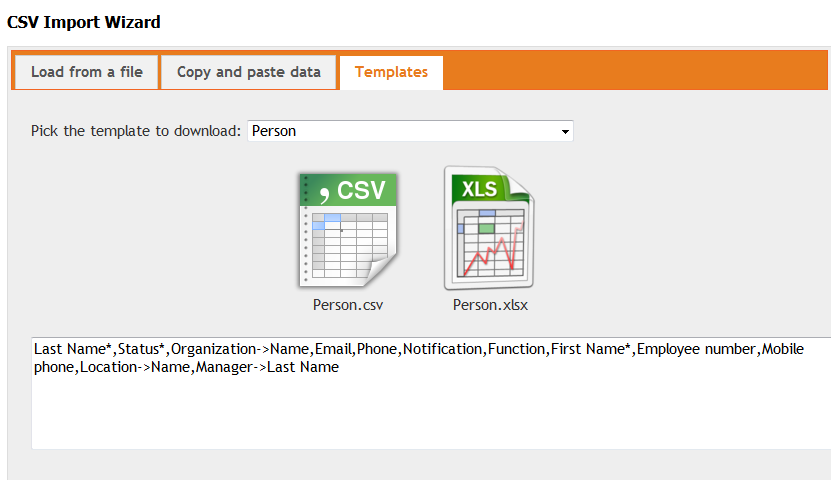
iTop provides CSV templates for creating/importing any class of objects. You can either download or copy/paste the template from the third tab Templates in the CSV Import wizard.
Select the desired class from the drop-down list to generate the template. Then either click on the big Excel icon to download the template, or copy/paste the text from the text area below the icon.
Expected format for values
In order to load some type of attributes, you need to provide their value in a particular format.
LinkedSet
Check here for the format required to import relationships
Date
Date format of the imported data can be specified during the import, but all dates in your source file must be using the same format. This format can be either the default one defined on your iTop or any that you specify.
Text with HTML
You can provide the raw HTML with tags. Example: <p><b>Bold</b><br>Yes</p>
Image / file (New in 2.4)
Some classes contain an image or a file document as one of their field. For example, the Person class, contains a Picture field which holds the picture of this person. When editing a Person interactively, the user can upload an image from her computer to provide the picture of the person. However when performing a CSV import, it is not possible to “upload” such a file or to put its content inside the CSV file itself, since the CSV format does not support this.
In such a case the CSV file must provide - in the appropriate
CSV column - an URL to upload the file
from. This URL must be accessible from the
iTop server and return the expected image (or file document). If
the upload fails or if the format of the uploaded document does not
match the expected format for the field (for example if the
URL does not return
an image for the picture field), the import/update
will fail for this field (and the whole line of the CSV will be
rejected).
-
The URL must point directly to the image to upload (redirections are not supported)
-
The URL must be accessible from the iTop web server (beware some public websites may deny access to a PHP script - they check the HTTP User Agent string)
-
The URL must not require authentication, since the upload is done by the iTop server itself
-
URLs pointing to iTop itself (like the URLs provided by CSV/Excel export) are supported. But only if they point to the same iTop instance (in such a case the import will parse the provided URL and will read the document from the iTop database).
-
If you use an administrator account to perform the CSV import, you can specify a path to a file located on the iTop server itself (but this works only for administrators).
External object
For loading an attribute which is an external key to another
object, you can provide any combination of attributes which are
declared as reconciliation attributes for the remote
class.
Example: if you were to load UserRequest and set the Caller (caller_id), you could provide any combination of those columns to identify the caller:
-
Caller->Email
-
Caller->Organization name
-
Caller->First Name
-
Caller->Last Name
-
Caller->Full Name
-
Caller->Employee number
TagSet
For loading a TagSet attribute, the tags have to be imported with their label separated by a pipe |. There must be a pipe at the beginning and at the end.
Uploading Data
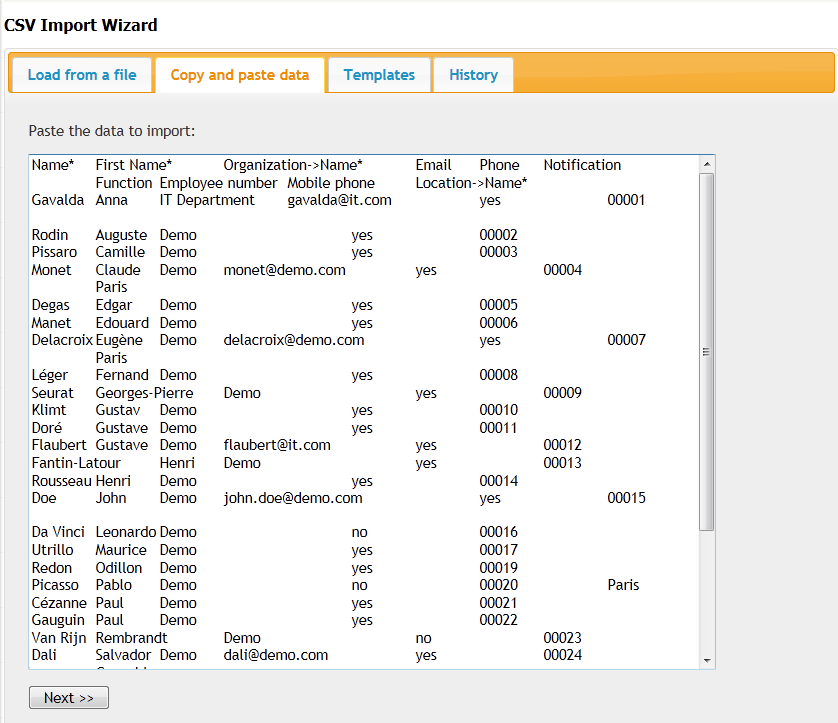
The first step of the CSV import consists of uploading the data to the server. You can either upload a file from your computer or directly copy/paste the data in the second tab of the wizard.
To upload the file from your computer, use the file upload form on the first tab of the wizard. Make sure that you also select the appropriate character set that was used for saving the file.
csv_import_charsets configuration variable).If you choose to copy/paste the data, use the second tab Copy and paste data of the wizard:
Then click Next » to proceed with the next step of the wizard.
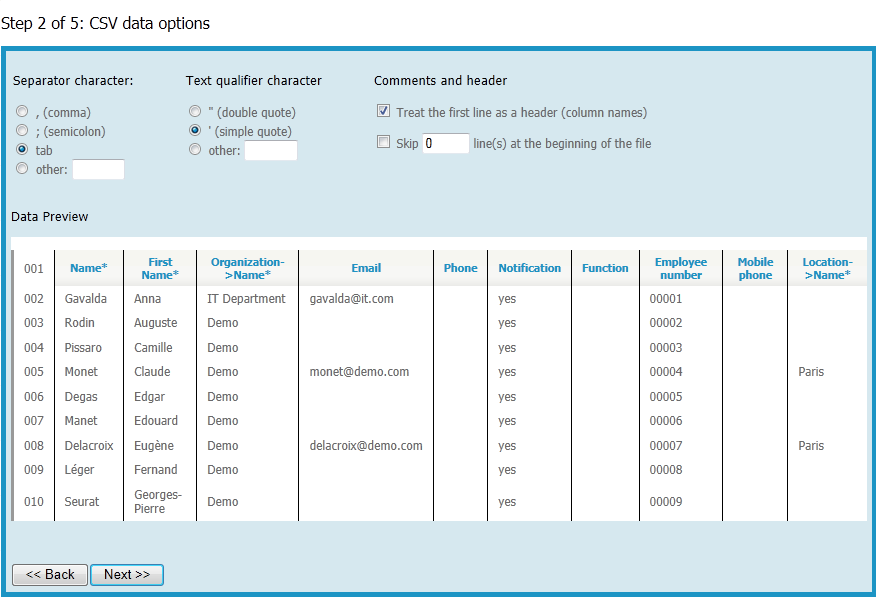
The following parameters must be adjusted during this step:
| Parameter | Meaning |
|---|---|
| Separator Character | This is the character used for separating the different columns inside the CSV file. If the columns are properly displayed and separated in the preview at the bottom of the page, then the current choice is correct. (The typical choice for a CSV file is the comma) |
| Text Qualifier Character | Sometimes the values inside the cells contain the separator character. Such fields are then enclosed by the text qualifier character to prevent the separator character from being wrongly interpreted in the middle of a cell. (A typical value is either a simple or double quote) |
| Treat the first line as a header | Check this box if the first line of the file contains a header (column names) instead of actual data. Note that on the preview at the bottom of the page, the header line is displayed with a different color. |
Skip x lines at the beginning |
Some CSV files (typically CSV files generated by hand-made scripts) contain some comments at the beginning of the file. Use this setting to tell iTop to ignore as many lines as needed to skip the comments. The skipped lines are removed from the preview at the bottom of the page. |
Once the data looks correct in the preview, click on the Next » button to move to the next step:
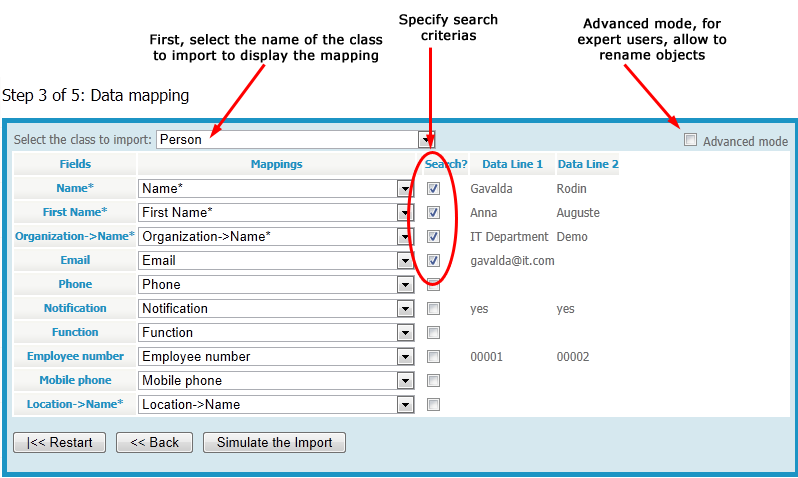
The third step of the Import Wizard defines the mapping between the column of the CSV file and the fields of the object in iTop. The first operation consists of selecting the class of objects to import. This determines the list of fields available for the mapping.
Fields Mapping
If the CSV file has been originally created using a template or an iTop CSV export, the header provided in the CSV should automatically give you the correct mapping.
If this is not the case, you have to create this mapping manually.
Search Criteria
The CSV Import Wizard can be used to either create or update
objects in iTop. The wizard uses the search criteria
defined at this step to determine whether each line of the CSV file
corresponds to an existing object in iTop or not. If the object
exists, then it will be updated, otherwise it will be created.
Typically in iTop search forms, all selected search
criteria are combined using the AND operator. (i.e. an
object must match each value of the Search
criteria to be considered as a match).
Administrators have access to an Advanced mode (a checkbox at the top-right of the page), which allows to import objects based on their internal identifiers (ID or Key number). This is useful for renaming objects exported from iTop. Do not use this option for objects not exported from iTop, or at least make sure that you know the data you are importing! The Advanced mode also allows administrators to import LinkedSet as described here.
Reconciliation attributes are defined for each
class in the Datamodel. If such attributes are provided in the
load, they are automatically set as Search
criteria.
Once the mapping and the search criteria looks correct, proceed to the simulation of the import by clicking on the Simulate Import: button.
Simulate import
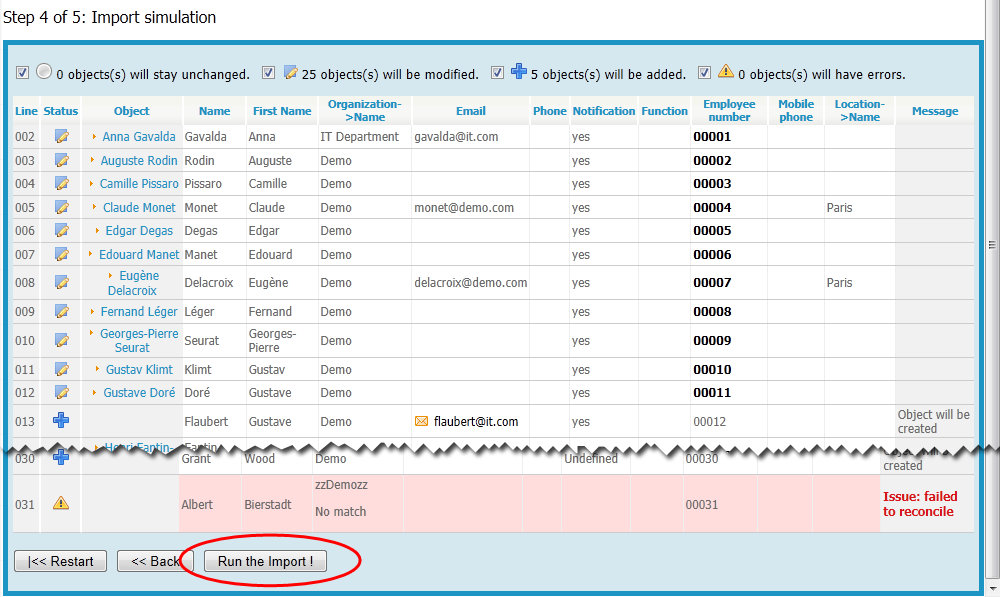
After a few seconds, the following summary screen is displayed:
Note the number of objects to be created and the number of objects to be updated, as well as the number of errors. You can use the checkboxes at the top of the page to filter the display for a quicker analysis of the results.
The lines in errors are highlighted with a red background. Errors will not prevent the import from running, but the corresponding lines will be rejected.
If the results from the simulation look wierd, maybe the
Search criteria aren't correct. then press
Back button to change them and Simulate again. If
you need to modify the data, click on |<<
Restart (the Copy and paste data tab
will contain a copy of the uploaded data). If the simulation looks
correct, click Run the Import! to perform
the actual import.
Run import
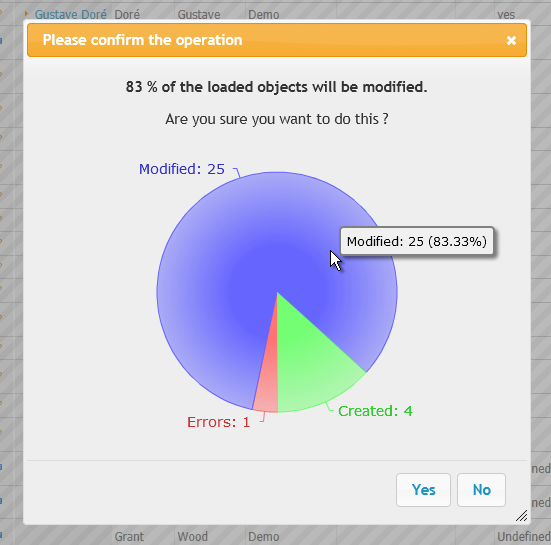
If the number of objects imported and the percentage of objects to be created or updated exceeds a certain level, a confirmation dialog is displayed:
Click Yes to close the dialog and proceed with the data import.
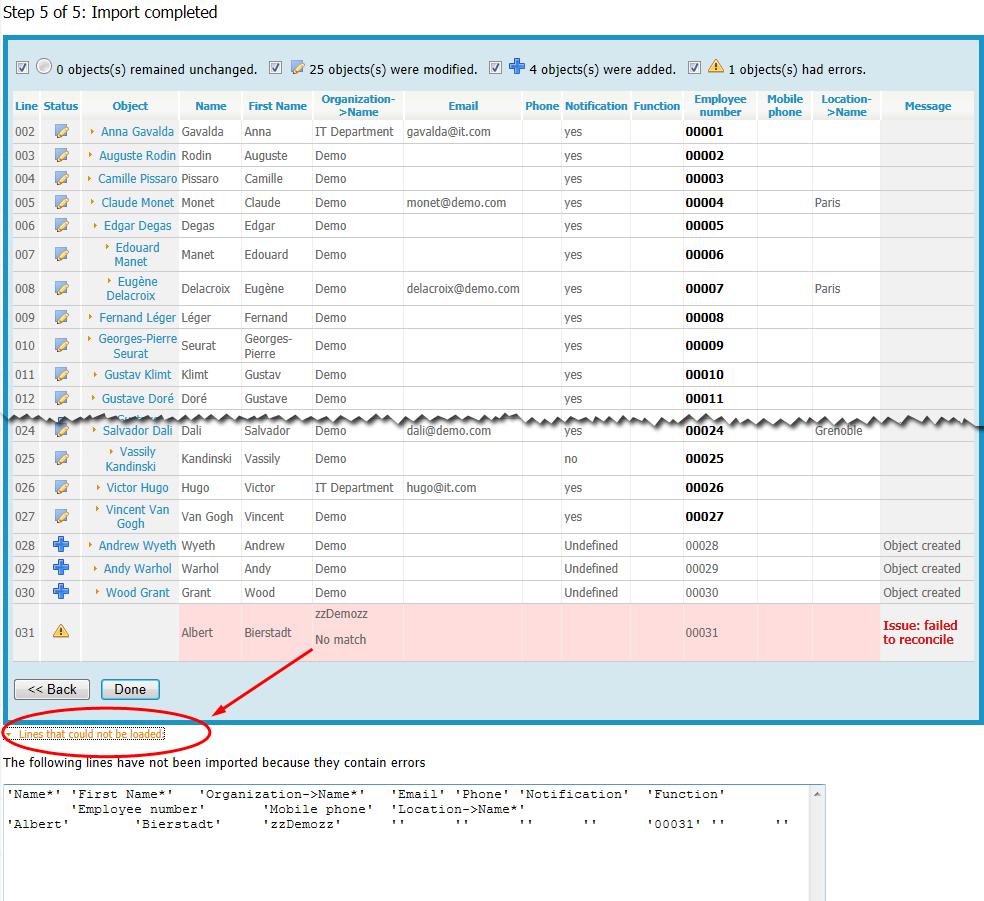
The last screen of the wizard displays the summary of the operations performed during the import.
An alternative to this is to proceed iteratively:
-
Complete the import wizard, and note which lines have errors. Lines containing errors are simply ignored.
-
Fix the lines in error in your reference CSV file.
-
Re-run the import with your reference CSV file (the whole file)
-
Repeat until no error is found.
iTop will ignore lines that have been unchanged, because the corresponding data is already up-to-date (unless modified between two imports by somebody else in the mean time ). Iterating on the whole CSV file may be the preferred option, if you need to maintain a reference CSV file of your data.
The Modify Action
iTop allows the bulk modification of a list of objects. This operation is very useful for setting a field of many objects to the same value, in one operation.
-
Bulk modification. This is only possible on a list if all the objects of the list are of the same class. For example, it is not possible to perform a Modify on a list of Contacts, since the list may contain a mix of Teams and Persons. If you want to perform such an operation, make sure that you narrow your search to just one class of objects.
-
Limited access. Not all users are allowed to perform bulk operations. If the menu item is not displayed in the drop-down list, ask your administrator to check the security profile of your iTop account.
-
Modifying a large number of objects. (several hundreds or more) This may require a lot of time to be performed. Since all interactive operations are time-limited (time-out) for security reasons, contact your administrator before performing major modifications, to check if this is allowed/sustainable in interactive mode. An alternate solution for large update operations is to prepare a CSV file that will be loaded directly on the server in command-line mode.
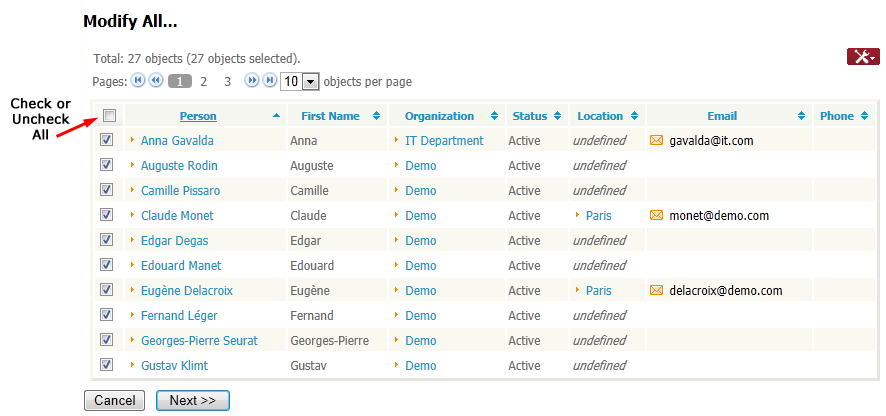
Select Modify from the Other Actions menu item, the following page is displayed:
At this step, you can select the objects to be updated. By default, all of them are checked and therefore will be modified. Browse the list to check that there is no issue and click on Next » to proceed to the next screen.
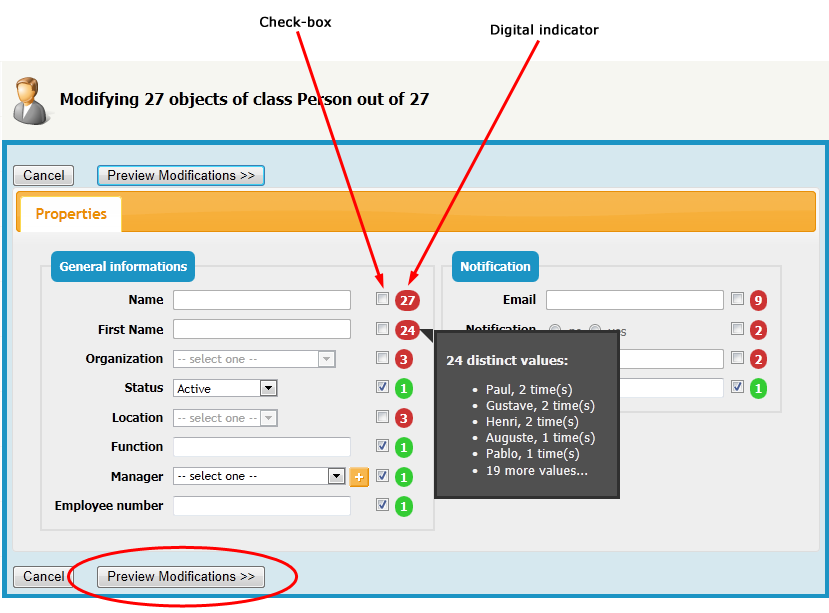
The object modification form appears with a
checkbox and a numeric indicator next to each field. The indicator
tells how many different values exist for this specific field among
all the selected objects. If all objects have the same value for
this field, the indicator is green ( ), the checkbox is checked and the field is
editable. Otherwise, the indicator is red and the checkbox is
unchecked. When the pointer of the mouse is positioned over a red
indicator, a tooltip is displayed showing information about the
different values of the field.
Only the fields for which the corresponding checkbox is checked will be modified. All other fields will remain unchanged. By checking the checkbox in front of a red indicator (i.e. a field that contains several different values among the objects) you can force all the values to the same homogenous value.
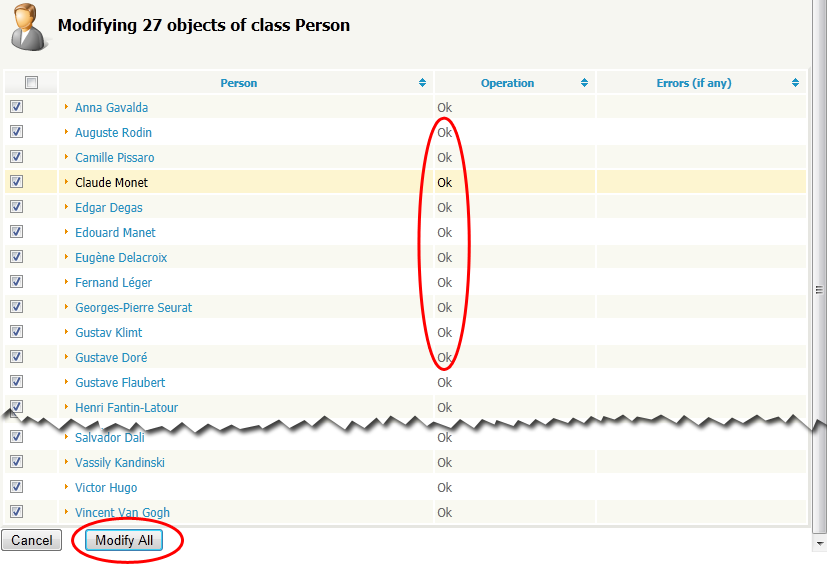
Click on Preview Modifications » to display a confirmation screen:
Inspect the list to check if any errors are reported in the Operations column, and when ready, click on Modify All to actually perform the bulk modification.


