Add a Dashboard on a Team
Prerequisite: You must be familiar with the
Syntax used in Tutorials and
have already created an
extension.
We also assume that you are familiar with dashboard design within
iTop and OQL.
- learning:
- Add a Dashboard attribute on a class
- level:
- Beginner
- domains:
- XML, Dashboard, Presentation
- min version:
- 2.6.0
You want to display on every Team, a new tab
displaying a dashboard with information specific for that team:
-
The list of open Tickets assigned to that team
-
A list of members limited to the active ones
-
The list of locations where at least one team member is located
-
…
Those are just examples of dashlets which could be defined, the purpose of this tutorial isn't to explain how to create a dashlet
OQL queries which could be used for the above examples
The list of open Tickets assigned to that team :
SELECT UserRequest WHERE STATUS IN ('assigned') AND team_id=:this->id
UNION SELECT Incident WHERE STATUS IN ('assigned') AND team_id=:this->id
UNION SELECT Problem WHERE STATUS IN ('assigned') AND team_id=:this->id
A list of members limited to the active ones :
SELECT Person AS p
   JOIN lnkPersonToTeam AS l ON l.person_id = p.id
   WHERE l.team_id = :this->id AND STATUS='active'
The list of locations where at least one team member is located :
SELECT Location AS L
   JOIN Person AS P ON P.location_id=L.id
   JOIN lnkPersonToTeam AS l1 ON l1.person_id=P.id
   JOIN Team AS T ON l1.team_id=T.id
   WHERE T.id=:this->id
with the Designer
Prerequisite: You must be a Combodo's customer
Create a Dashboard Attribute
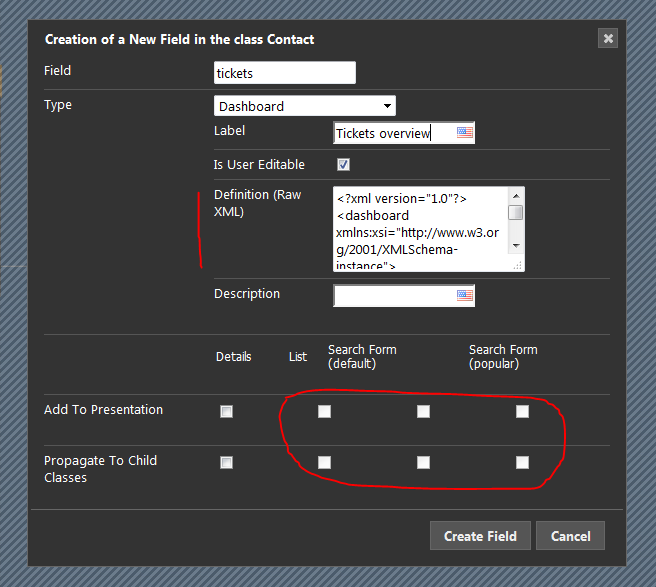
Go to the Team class, tab Schema to create a new field:
-
Enter overview as field Code (lower letter only, no blank, dash or other non alphabetical characters),
-
chose Dashboard for type
-
Give it a label
A Dashboard Attribute is a dashboard displayed as an extra tab on a object. The queries used in such a dashboard can use the context of the current object.
Dashboard attributes can be added and all their parameters can be set and modified within the ITSM Designer.

-
You can allow normal users to create a customized version of such a dashboard by checking the field
Is User
Editable
. -
Even if it is not user editable,
Administratorsare always allowed to customize a dashboard. This allows for designing dashboards at run time (using real data) before injecting their definition in the Designer.
Definition (Raw
XML)
of the Attribute dashboard:
-
just leave the default XML at creation,
-
do a
Move to TestorMove To Production, -
once in iTop, edit and modify that dashboard as you want,
-
use the action
Export to a file -
open that file with any text editor and copy its content
-
return into the ITSM Designer
-
paste the dashboard XML in the Attribute Dashboard
Definition (Raw XML)
with an iTop Extension
Prerequisite: You must be familiar with the Syntax used in Tutorials and have already created an iTop extension.
Create a Dashboard Attribute
For this you will need to create a new
AttributeDashboard field to the Team class and add it
to the details display.
- itop_design / classes
-
    <class id="Team" _delta="must_exist">
      <fields>
        <field id="dashboard" xsi:type="AttributeDashboard" _delta="define">
          <is_user_editable>true</is_user_editable>
          <!-- Use this default definition for creating a new dashboard -->
          <definition>
            <!-- Later replace the whole definition with the XML export -->
            <layout>DashboardLayoutOneCol</layout>
            <title/>
            <auto_reload>
              <enabled>false</enabled>
              <interval>300</interval>
            </auto_reload>
            <cells>
              <cell id="0">
                <rank>0</rank>
                <dashlets>
                  <dashlet id="0" xsi:type="DashletEmptyCell">
                    <rank>0</rank>
                  </dashlet>
                </dashlets>
              </cell>
            </cells>
          </definition>
        </field>
      </fields>
      <presentation>
        <!-- Dashboard can only be displayed in the details -->
        <details>
          <items>
            <!-- Dashboard can be displayed neither in a fieldset, nor in a column -->
            <item id="dashboard" _delta="define">
              <rank>100</rank>
            </item>
          </items>
        </details>
      </presentation>
    </class>
Add a dictionary
entry for class:Team/Attribute:dashboard.
Design your Dashboard
Deploy a first version of your extension, which will provide an empty dashboard. Redesign this dashboard within iTop
Example using the id of the team:
SELECT Person AS p JOIN lnkPersonToTeam AS lnk ON lnk.person_id = p.id WHERE lnk.team_id=:this->id
When satisfied with your design, export it in XML and replace the content of the initial <definition> with the exported <dashboard> tag content:
<?xml version="1.0"?> <dashboard xmlns:xsi="http://www.w3.org/2001/XMLSchema-instance"> <layout>DashboardLayoutOneCol</layout> <title/> <auto_reload> <enabled>false</enabled> <interval>300</interval> </auto_reload> <cells> <cell id="0"> <rank>0</rank> <dashlets> <dashlet id="1" xsi:type="DashletObjectList"> <rank>0</rank> <title>Members</title> <query>SELECT Person AS p JOIN lnkPersonToTeam AS lnk ON lnk.person_id = p.id WHERE lnk.team_id=:this->id </query> <menu>true</menu> </dashlet> </dashlets> </cell> <cell id="1"> <rank>1</rank> <dashlets> <dashlet id="0" xsi:type="DashletEmptyCell"> <rank>0</rank> </dashlet> </dashlets> </cell> </cells> </dashboard>
Replace all tags under the <definition> tag by what you find in your XML export under the <dashboard> tag:
- itop_design / classes / class@Team / fields
-
        <field id="dashboard" xsi:type="AttributeDashboard" _delta="define">
          ...
          <definition>
            <!-- Paste here the XML export of your Dashboard designed directly in iTop -->
          </definition>
          ...
And run the setup again.
-
Everyone will see that dashboard on all Team objects.
-
Users can also twist it to build their own version of the Team dashboard,
-
but they all share the common version that you have designed and pushed on iTop.
If you push a new version of that dashboard:
-
every one will get it
-
customized versions of the dashboard, also they were build on the previous common dashboard, will remain unchanged.
